Thursday, August 12, 2010

Wednesday, August 11, 2010

Tuesday, September 15, 2009

Assignment 2 - Fifi : Birthday Party


Make sure internet connection is good

Reflection of Exercise 1

Hello guys...wassup2. Today im just wanna share the exercise 1's steps. Here are our steps :


Step 1 : Setup a site

1. Create new site named registration (URL = http://localhost/registration/.)
2. Select "ASP VBScript" as a server technology.
3. Save file at "c:\inetpub\wwwroot\registration\"


Step 2 : Setup the Database file in Access

1. Click blank database
2. Insert fields : ID, names, username, password and remarks.
3. For password field, change the type into password.
4. Save "data.mdb" as MS Access 003-2003 format in "c:\inetpub\wwwroot\data\"
5. Close the database (important)


Step 3 : Setup the Connection

1. In Dreamweaver, open ASP page and click Window>Database.
2. Click (+) button and select Custom Connection String.
3. Named the connection as "dmx" and then insert the connection string and choose "using driver in testing server".
4. Test the connection and it was succesful.


Step 4 : Setup the Form

1. Create new page with ASP VBScript.
2. Insert the text and textfield for name, username, password, and remarks from the form menu.
3. Create a "save" button.
4. Each textfield name was matched with the fields in the database.
5. Change the password type into "password".
6. Set Multiline for remarks and 80 char for the rest textfields.
7. Save in "c:\inetpub\wwwroot\registration\" and named it as registration.asp.


Step 5 : Writing a data into databse using the insert record

1. Activated "Server Behaviour" tab and click (+) and select "Insert Record"
2.Choose dmx connection then click OK.
3. We save our file


Step 6 : Reading/Viewing a data from a database using RecordSet

1. Create new ASP VBScript file and save it as view.asp.
2. Create a viewing table consist of all user personal info.
3. Activated ServerBehaviors tab, click (+) and select RecordSet(Query).
4. Choose the dmx connection.
5. Choose "name" and "ascending".
6. Then activated Binding tab. Click (+) and select RecordSet(Query).
7. Drag each recordset into its textfield in view.asp.
8. After that, create a line below the table and hightlighted it including the table.
9. Click (+) and choose "repeat region", then select "recordset1" and click at "all records".
10. Save the file ( this file is for viewing the record only)


Step 7 : Execute the file

1. Open back registration.asp the double click "Insert Record Behavior " in "Server Behavior" Window.
2. Added up "view.asp" in "After inserting, go to : "section.
3. Then saved it
4. Click "Preview" in Browser icon.
5. After the page loaded, we fill up the data in every textfield and click "save" button.
6. Then we can see the information in the table in view.asp.
7. After we insert a new record, the record also can be view together with the previous one.
8. After everything main part was OK, we inserted images to make it more attractive.
9. Save the file.


FINISHED!!!! :)

Friday, September 4, 2009

Step I did in Lab Test

Here i want to share steps that i did in lab test.


SHAPE TWEENING

1. I created a black circle and named that layer as 'background' then I locked the layer.
2. Add new layer and named it 'number' (I will refer it as LNum from now).
3. In (LNum, frame 1) I chose the text tool and type in '1', then break it apart.
4. In (Lnum, frame 15) I chose the text tool and type in '2', then break it apart.
4. In (Lnum, frame 30) I chose the text tool and type in '3', then break it apart.
5. Between these keyframes, I inserted shape tweening.
6. For smoother tweening, you can add shape hint.


MOTION TWEENING

1) I added new scene named 'scene 2'(but i think it was not required)
2) Named the layer as 'Text'. (I will refer it as LText from now).
2) Using the text tool, type ' Animation in Adobe Flash CS3' (in small size).
3) Then i convert it into symbol -> graphic.
4) Copy the keyframe and i pasted it in (LText, frame 20).
5) I resized the text, make it become bigger.
6) Then add motion tween between them.


ADD NEXT AND HOME BUTTON

1) I add 2 new layers (actly 1 layer is enough), and i named it 'button : home' (LHome) and 'button :next' (LNext).
2) I created a 'next' button in keyframe 20 in LNext, because i wanted the button to be visible after the motion tweening of the text is over.
3) I put this action script in 'next' button :

on (release) {
gotoAndPlay("Scene 3", 1); //scene 3 is my next scene
}

4) Then I created a 'home' button in keyframe 20 in LHome.
5) I put this action script in 'home' button :

on (release) {
gotoAndPlay("Scene 1", 1); //scene 1 is the shape tween scene
}

6) I add new layer in the timeline, named it as 'script' and I inserted keyframe on frame 20.
7) In that keyframe, i put stop();


QUESTION, ANSWER & FEEDBACK

1) I add new scene - scene 3
2) I named the first layer as 'question', and use text tool to write the question.
3) Add 2 new layers for 'yes' and 'no' button, and create a button in each layers.
4) Add new layer for 'home' button. You just can drag it from your library.
5) Add new layer and named it as 'feedback'. Then choose text tool, but this time use 'dynamic text'. In it var textbox, type in 'feedback'.
6) Add new layer and named it as script. Insert this script in the keyframe :

stop();
var feedback = "";

7) In yes button, put this script :

on (release) {

feedback = "Congratulations..you choose the correct answer";
}

8) In no button, put this script :

on (release) {

feedback = "Sorry..this is not the correct answer";
}


FINISH!!!!

Thas all. If i missed something..please forgive me :). And sorry for my poor English..hahaha.
.
.
.

Friday, August 7, 2009

Jump from scene to scene

Right now, I want to share about how to jump from a scene to another scene. This is important because for our Assignment 2, we must do this. I just give a simple example here, because it just for a reference. I named this application as 'Animal Planet'. These are the steps :

1) 1st of all, please make a FLOWCHART for your application before opening Flash. This will give you better understanding about the flow of your application. The HOME/MAIN interface will be a root of the flowchart and follow by others.


2) Each boxes represent a scene. I have 5 scenes in my project and I named them; Home, Monkey, Bird-1, Bird-2 and Bird-3. Home scene acted as a main interface for the application. For 'Bird', it has 3 pages so that means it using 3 different scenes in the project.

3) For more information, you can use a simple Flash aplication below that (maybe) will help you (I hope so).

4) From there you can see samples of application's interfaces together with scripts for each button in that interface.


* make sure the speed of internet connection is good, or else many errors will occur

5) Make sure each pages/interfaces have a 'Home' button (except for Home page itself) because it will bring the user back to the main page.

Thats all for now. If I missing something, I will update it later because rite now I'm so sleepy..zzZZzzz
.
.
.

Transparent images/graphics

Here I want to share share something with you guys, and it is about how to make a graphic/picture become transparent. In certain situation, you really need this kind of effect for example if you want to create an image of water/river/pond and so on.

In this example, firstly I draw a Moo image and water image and then combining them like the picture below (Water layer need to be placed above of the Moo layer).


After that, click on the water on the screen(still in Bitmap format) -> right click -> choose 'convert to symbol'.


Then choose 'Graphic' and give a name for the image. I renamed it as 'water'.


Now look at the 'Properties' at the bottom of the screen. At the 'Color Dropdown Menu', choose 'alpha'.


Then adjust the given percentage. Decrease the value until you satisfied with the result.


Finally..the processes are completed. Now you can see Moo's lower body through the water. Try it :)

.
.
.

Thursday, August 6, 2009

Easier way to do scripting

1st of all...sorry for my poor English. Im just wanna share something with you guys about dealing with script. For those who already know about this, just skip this post.

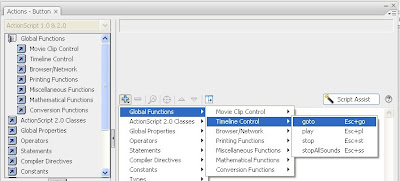
Did you know that Flash have provided us with something that can help us when scripting? Did you ever noticed the 'Script Assist' button at the upper right of the scripting window? I marked the button with the red circle in the picture below. Before you start scripting, press that button first.


After you have clicked the button, choose the script which you want to use. In this example, I will use goto script for a button.


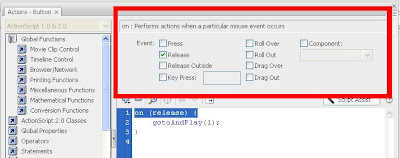
Then you will see the script is automatically written on the screen. When the 'gotoAndPlay(1)' is highlighted, you can see there are 3 textboxes above :

Scene (You can choose which scene to go after clicking)
Type (Whether it is determine by frame number or others, let it be 'frame number)
Frame (At which frame you want it to go in the scene)


If you highlighted the 'on(release)' script, there are some event checkboxes for a mouse which you can select..its up to you.


I hope this will help you a lot. Thank you and sorry for my poor English...
.
.
.

Review : How to create a button in Flash

1st of all..sorry for my broken English. I will try to explain this as good as I can. One of my classmate asked me to show her how to create a button because she did not remember how to do that. These are the steps that you need to follow :

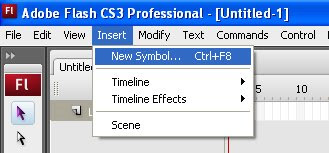
1) Click Insert > New Symbol or you can easily press Ctrl+F8


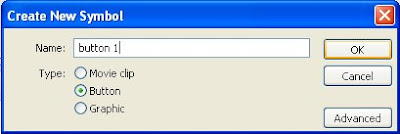
2) A dialog box will appear. Give it a name, for example 'button 1'. Choose 'Button' then click OK.


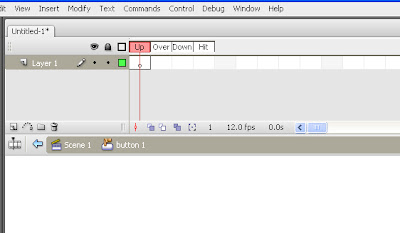
3) Then Flash will bring you to button 1 screen, where here you can design the shape, color and whatever you wanted for this button. The screen will looks like this :


4) As you can see, there are 4 type of button condition. Up = normal shape of the button. Over = when the mouse over the button. Down = when user press the button. Hit = not sure, maybe after user release the mouse after clicked.

5) From here, you can determine what will happen to the button when it got hit, over or down. In this example, I only fill in the Up, Over and Down keyframes.

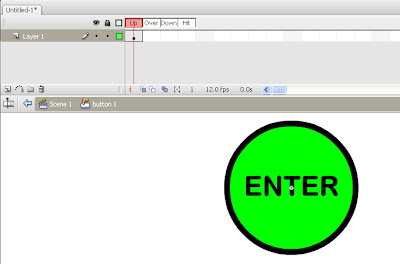
6) Up : here you need to draw the basic shape for this button. I'm going to use circle as a shape of this button and put on it word 'Enter'. You can use whatever shapes that you wanted to, also you can use free buttons from the internet. After I draw the button, you can see that the Up Box has been filled by a keyframe.


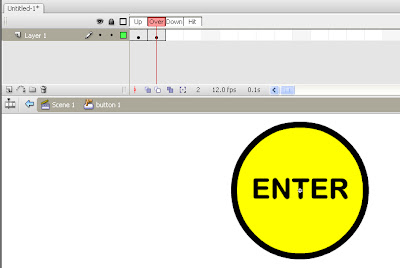
7) Over : Click on the Over box at the timeline. If you wish to make the button changing shape when the mouse cursor is over it, you can erase the button and draw a new one (But make sure the Over Box is highlighted).

8) But in this example, I will use the same design. I only wanted to change the color of the button into yellow. What I'm going to do are first, copy the frame in the Up Box and paste it into the Over Box. Then change the button's color to yellow. This process will make the button change to yellow when the mouse cursor is over it.


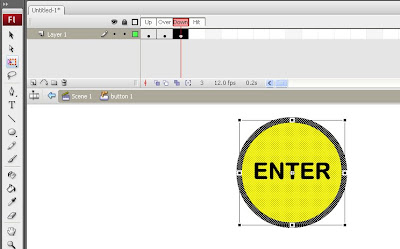
9) Down : Then copy frame in Over Box then paste into Down Box. The box will determine the shape or color of the button when the user click it. In this example, I will make the size of the button smaller than the normal one. It will give user an illusion like the button has been pressed. You can resize it using Free Transform Tools from the toolbox at the left of the screen.


10) After that, the button is completed. Back to your main scene, and the button is located in the libaray. You can just drag and drop it whereever you wanted. If you test the movie, the button will looks like this:


I hope this example will help you for Assignment 2. Sorry for my poor English

Moo : Episode 2